3D Cloth Modeling with Marvelous Designer/用Marvelous Designer建模3D布料
翻译by:cger.com

Back in January I featured Ramon Zancanaro Second Floor, Block 1 work featuring amazing 3d fabrics utilizing an application named Marvelous Designer.
早在今年一月份我发表了 Ramon Zancanaro Second Floor, Block 1 工作具有惊人的3d织物效果利用一个应用程序名字叫Marvelous Designer。
Ramon promised to come back and share his 3d Fabric / Cloth workflow using Marvelous Designer with us.
Ramon答应回来并分享他的3d织物/布工作流使用Marvelous Designer。
It took some time, but today Im happy to publish this article about how he used it to create various fabric elements in the scene you see in the image above.
它花了一些时间,但是今天我很高兴发布这篇关于他如何使用它来创建各种织物元素在场景中你看到的。
Enjoy!
享受它吧!
作者 : Ramon Zancanaro
Ramon is a 3d artist based in Bento do Sul, Brazil.
雷蒙是一个3 d艺术家位于巴西的 Bento do Sul。
介绍
I would like to thank all of you for the great feedback and appreciating my work on the Second Floor, Block 1 scene.
我想感谢所有反馈和欣赏我的作品 Second Floor, Block 1的人。
As promised back then, I decided to post a series of 3d fabric / cloth making tips that relate to the making of that scene.
正如当时所承诺的,我决定发布一系列的制作这些场景里3d织物/布制作的技巧。
This was my first attempt at using Marvelous Designer, a software that changed the way I model fabrics and cloths in all my scenes since then.
这是我第一次尝试使用Marvelous Designer,一个软件,改变了我建模面料和布在我以后所有的场景里。
I also seen many of my fellow 3d artists start using what now seems to become a tool fundamental for interior visualizations workflow.
我也看到许多的3d艺术家开始使用,现在似乎成为基础室内可视化工作流程的一种工具。
Originally intended for use in the fashion Industry but trust creative people to come up with special case use for it as we do in the Archviz BIZ.
这个软件最初的用途是在时尚产业 但依靠有创造力的人开始使用它在建筑可视化行业。
So Let's Start!
下面让我们开始吧!
I focused on 3 elements in my scene and went into the detail of creating the fabric / cloth part in each of them.
我专注于3个元素在我的场景里,细化细节在创每一块建织物/布。
The Bed Lower Bar with Wrinkled Cloth
床上较低的地方的皱纹布
翻译by:cger.com
Marvelous Designer supports a great amount of polys in its simulations, However, I decided to break up this part into smaller pieces of cloth that will be cloned (4 parts in each bed side).
Marvelous Designer 支持大量的多边形的模拟,然而,我决定把这部分分成小块布(4部分在每个床侧)。
This way I could save on resources and have more control over the process.
这种方式我可以节省资源并有更多的控制过程。
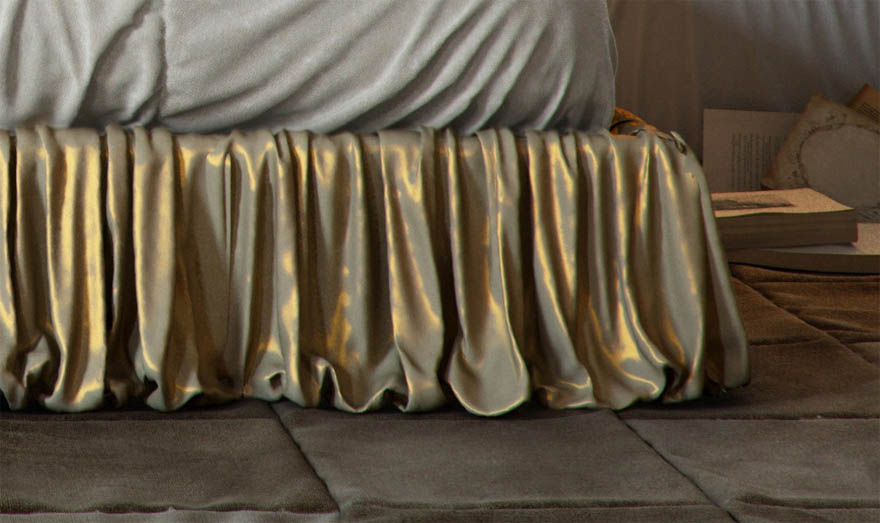
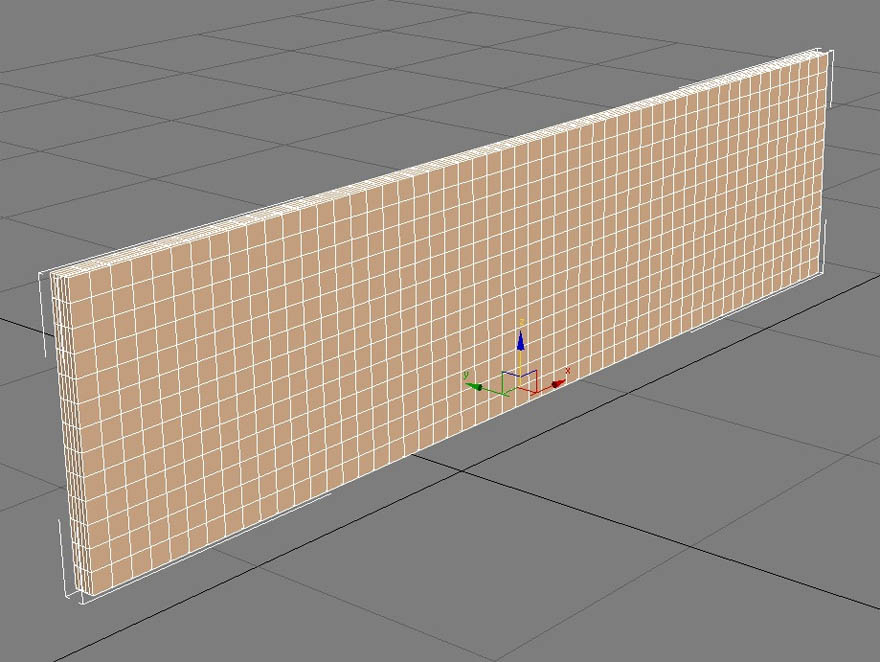
1.I created the base in 3ds max using a simple box slightly away from zero point.
1.我创建了基本模型在3ds max,使用一个简单的box稍微远离零点。
I use a good amount of subdivision because Marvelous Designer simulation works better that way from my experience with it so far.
我使用大量的细分因为Marvelous Designer模拟效果更好,这是我迄今为止的经验。
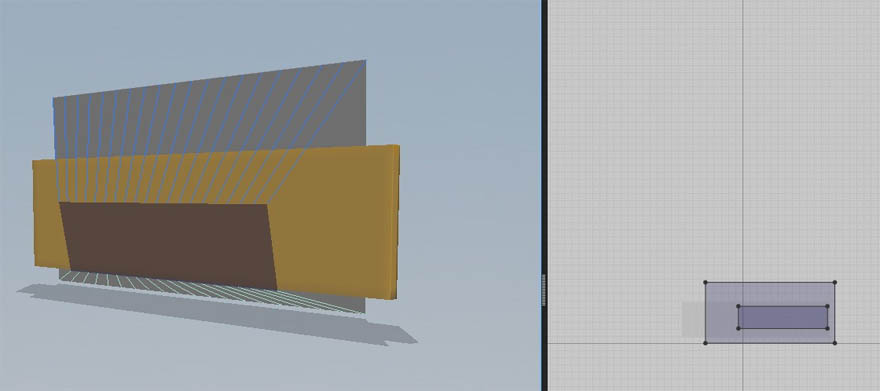
I organized the cloth shapes in Marvelous Designer as you see in the image below.
我组织了布的形状在Marvelous Designer,就像下面的图片一样。
The smallest pattern stays deactivated Meaning, the seams are visible, but it behaves as a static object.
最小的模式保持关闭 意思是,缝合线是可见的,但是它表现得像一个静态对象。
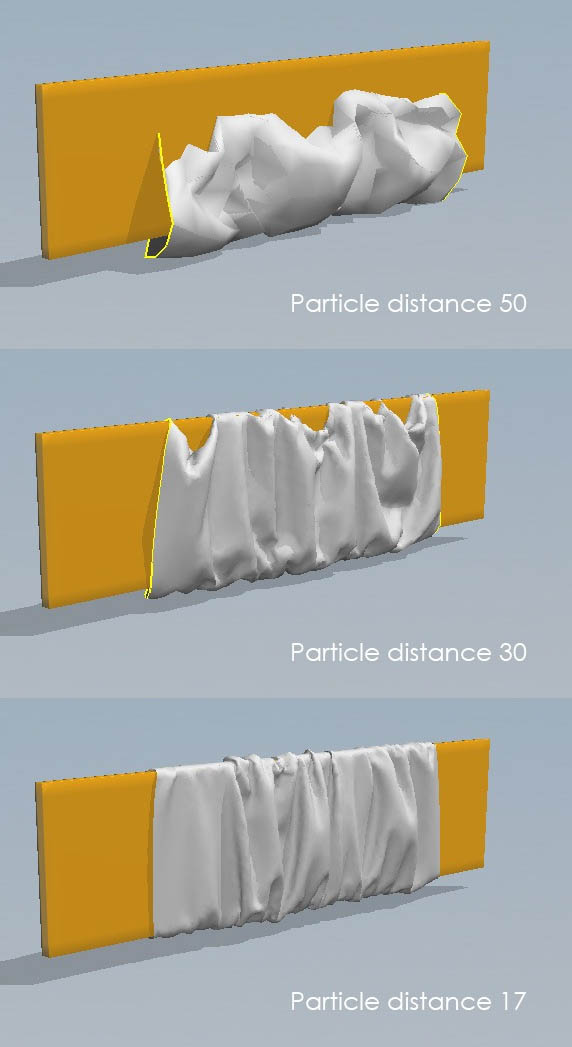
3.It's important to get the amount of fabric element subdivisions right (named particle distance), as it might intersect with the base object if the amount is too low or too high.
3.布料元素的细分值很重要(称为粒子的距离),因为它太低或者太高可能会使得布料和物体交叉。
It is really a case of trial end error.
这是一个计算出错范例。
See below some tests
参见下面一些测试
4.After the Simulation, I had to activate the smaller cloth.
4.计算以后,我不得不激活小布。
Remember that this part can be made with less faces than the one in front that will be seen in the render.
记住,这部分可以用更少的面相比正面将会出现在渲染里面的那块布料。
Using the Pins (Shortcut W), I fixed some points above the bar so the cloth won't move there.
使用针(快捷W),我修正了一些方块上面的布料,因为布不会滑到那里。
Then, on the pattern edition tool I just increase the dimension of the back part, making the cloth dropping to the floor a bit.
然后,在图案编辑工具我增加后面部分的尺寸,使布滑落到地板上一点。
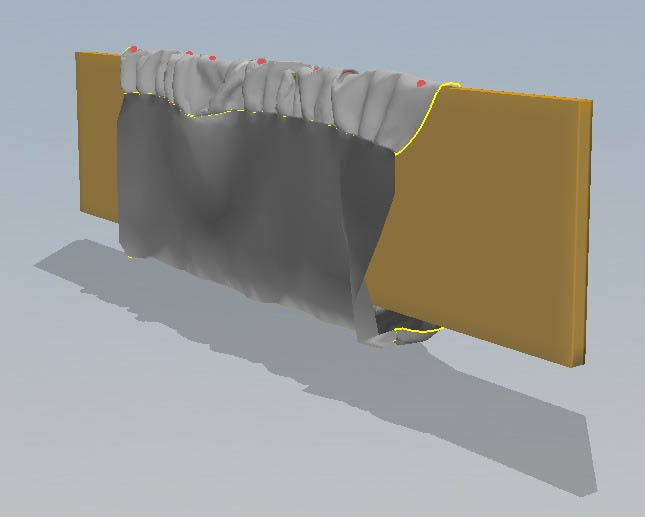
5. I placed some pins on the front of cloth too.
5.我在布料的前面设置了一些大头针。
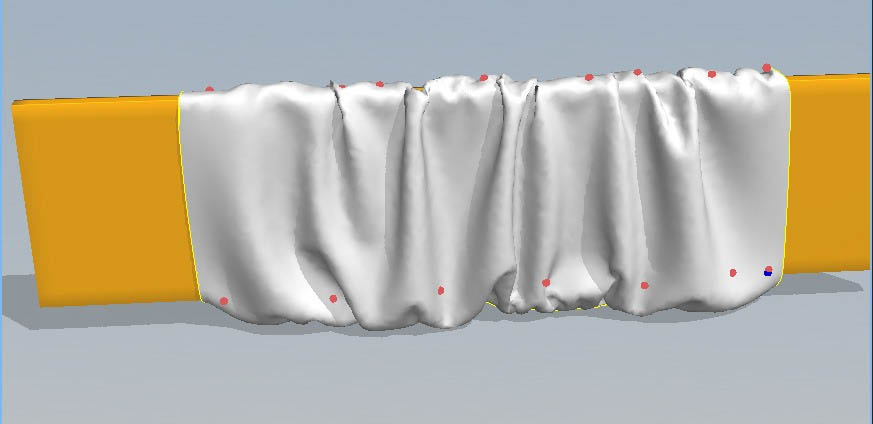
6. And moved them in order to achieve some more wrinkles.
6.移动他们以获得更多的褶皱。
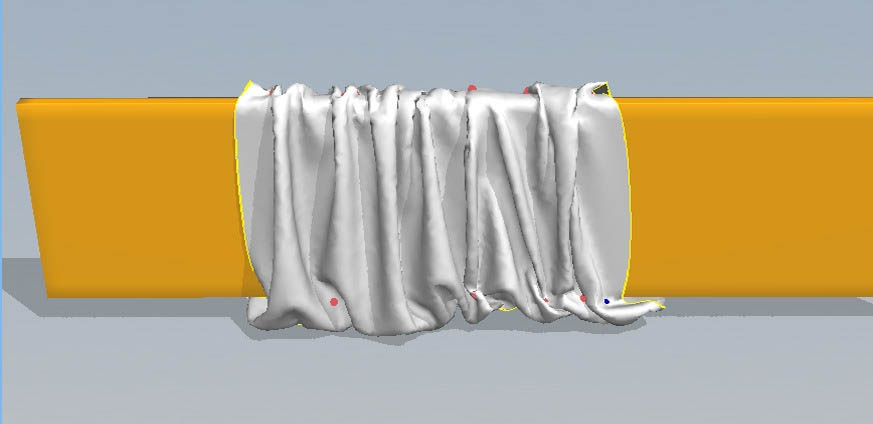
7. With the simulation paused, I removed all the pins and placed only four pins on the extremities to avoid the cloth to have old pin marks.
7在仿真的中间暂停了一下,我删除了所有的大头针,只保留四根针在四端来避免布有大头针的痕迹。
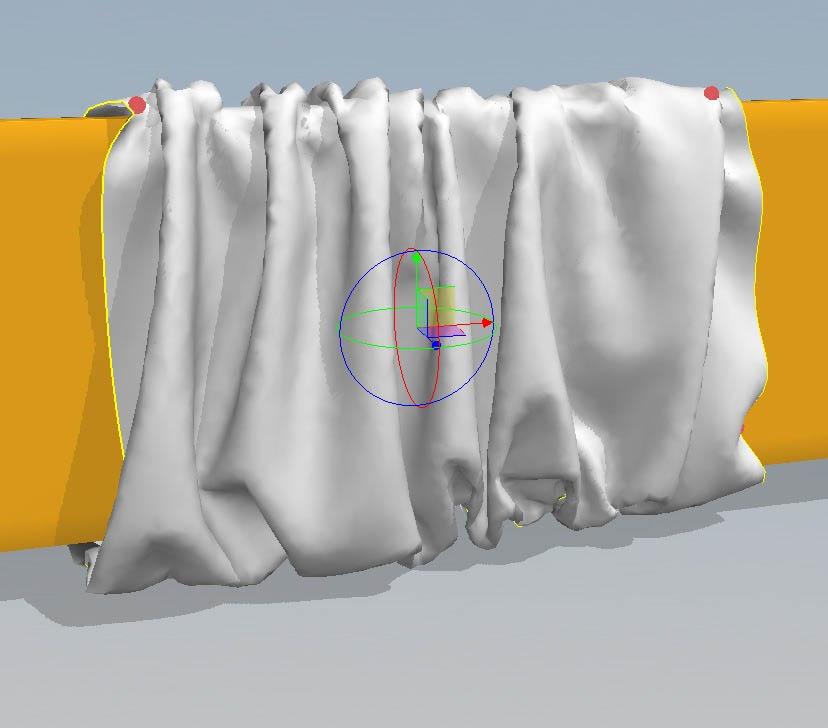
8. I reduce the particle distance on the bar and left that to simulate a few more passes for the dropping to look more natural for that subdivision.
8.我降低了粒子距离再继续模拟一段时间让下垂的布料看起来更加自然。
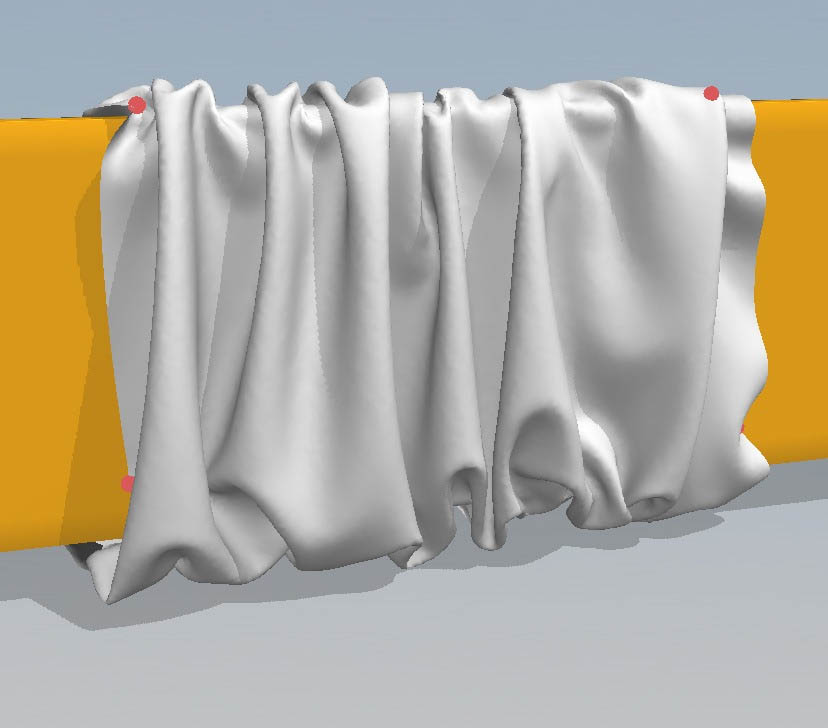
And that is it for the bed bar.
这就是BAR的布料。
The Rug/地毯
翻译by:cger.com
The great trick of this rug is the thickness.
地毯最大的技巧是厚度。
The models in Marvelous Designer contain far too many faces, rendering the use of global thickness for an object useless (or just highly impractical).
这个模型在Marvelous Designer含有太多的面,渲染时使用全局厚度很不好(或者仅仅是非常不切实际的)。
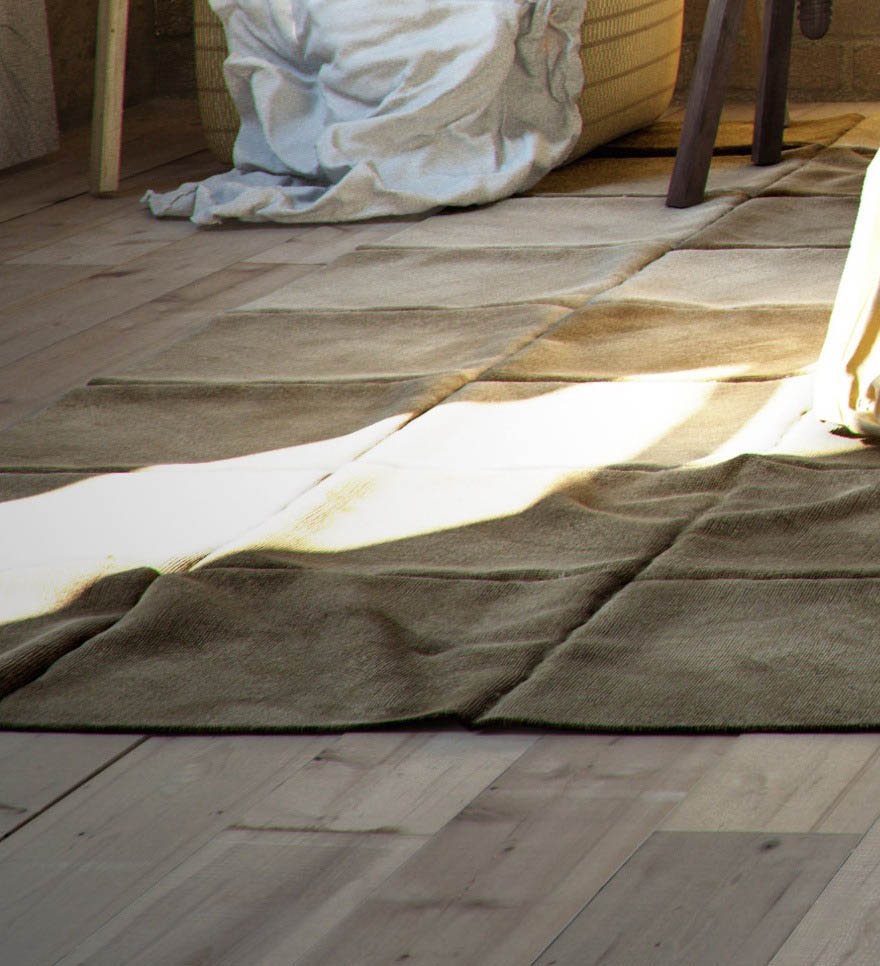
Let's see how to make it
让我们看看怎么制作...
1.The rug starts with some seaming squares.
1.地毯始于一些缝合的矩形布料。
A tip on that is give a bit of movement on the small bends on rug.
小技巧:给一点随机方向在小地毯上的接缝上(意思是接缝不要横平竖直的)。
For that, you have just to use small differences on size like you can see in the right side of the image below.
你刚刚用小尺寸差异对像,你可以看到效果在右下边的图片。
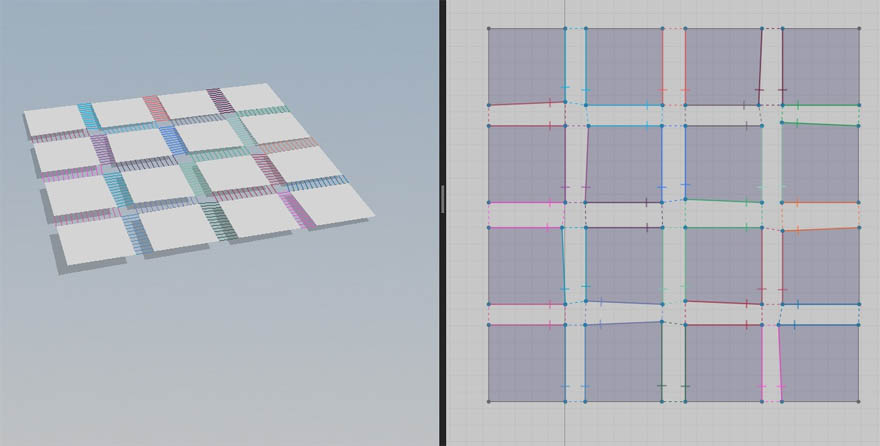
To achieve the effect on the seam, you need to change the angle of the bend (Fold Angle).
为达到影响接缝,你需要改变角弯曲(折角)。
You may also need to change the intensity of the fold (Fold Strength) .
你可能也需要改变褶皱强度(折强度)。
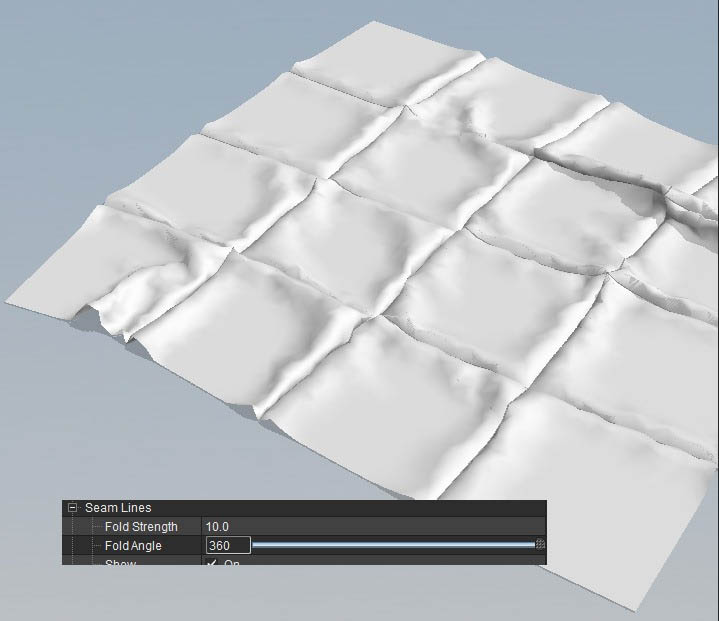
The result is already interesting, and you only need to subdivide a bit more and make the simulation run for 3-4 additional passes.
结果已经是有趣的了,你只需要再细分分多一点,使仿真再运行3 - 4个进程。
This is probably one of the best tips for cloth simulation Start with a base mesh, Simulate, Pause, Subdivide it more and iterate until you get the desirable result.
这可能是最好的一个秘诀 从一个基本面、模拟、暂停、细分更和迭代,直到你得到满意的结果。
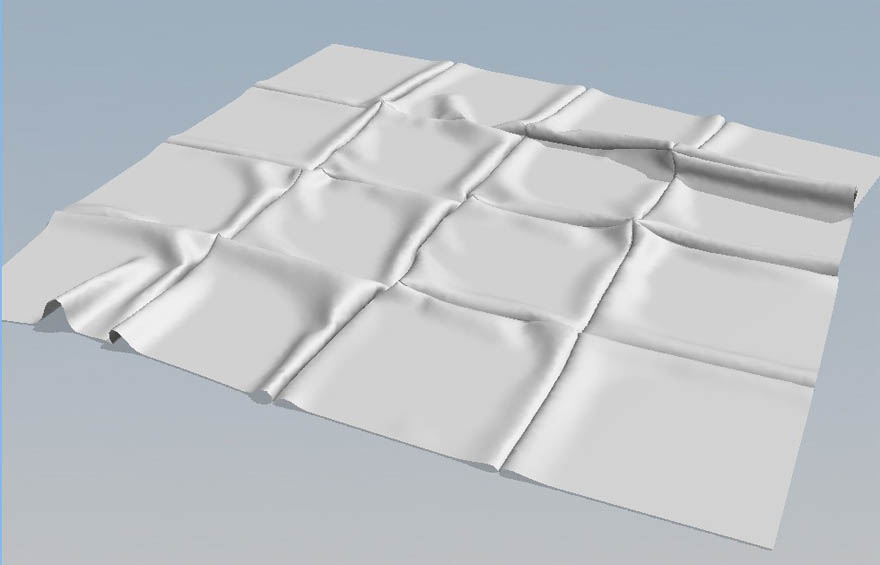
In 3dsmax, I imported the rug and converted it to an editable poly.
在3 dsmax软件里,我导入了地毯,把它变成一个可编辑多边形。
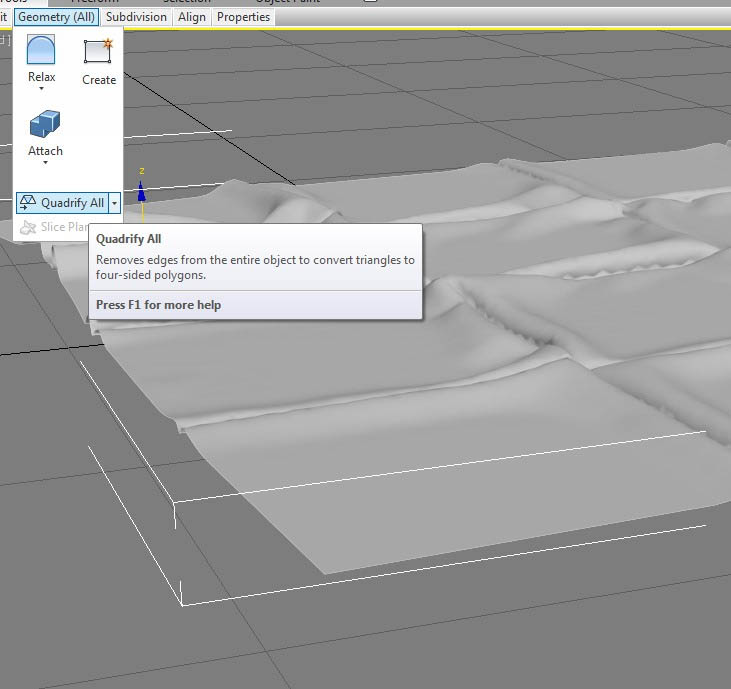
The procedure that I make with all the models from Marvelous Designer is using the Quadrify All command.
这个过程,我让所有的模型在Marvelous Designer使用Quadrify命令。
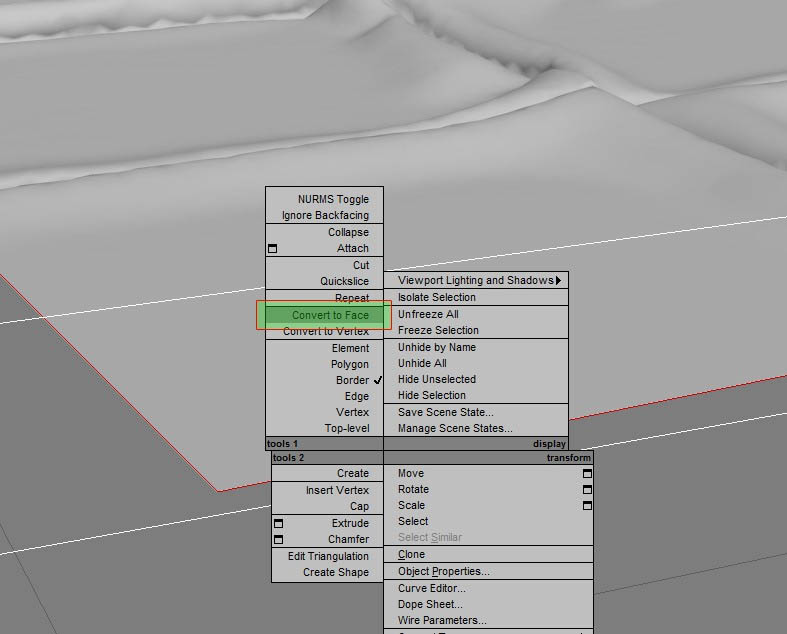
5. Select the border and convert into Poly.
5.选择边并塌陷成POLY。
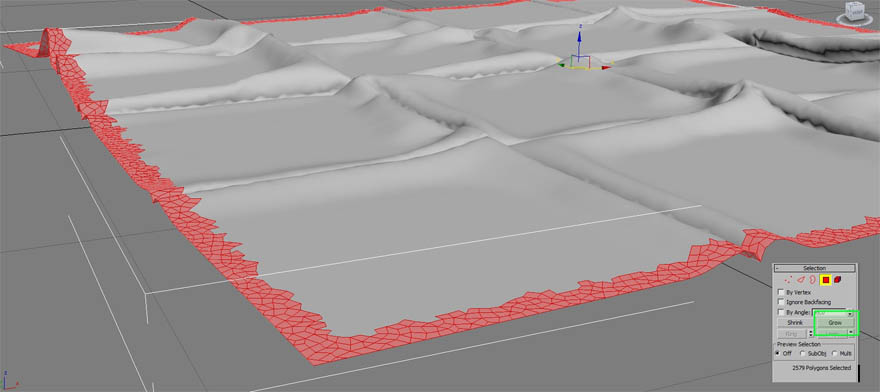
6.Utilize grow on the edit poly commands panel.
6.利用编辑多边形命令面板的 grow 命令。
Select some other faces growing 3 steps in this case.
重复次3个步骤选择一些其他面在这种情况下。
7. Split the faces from the original model (Detach). In this object I use shell to give the thickness only to the borders.
7.把面从原始模型(分离)。在这个对象我使用shell给厚度。
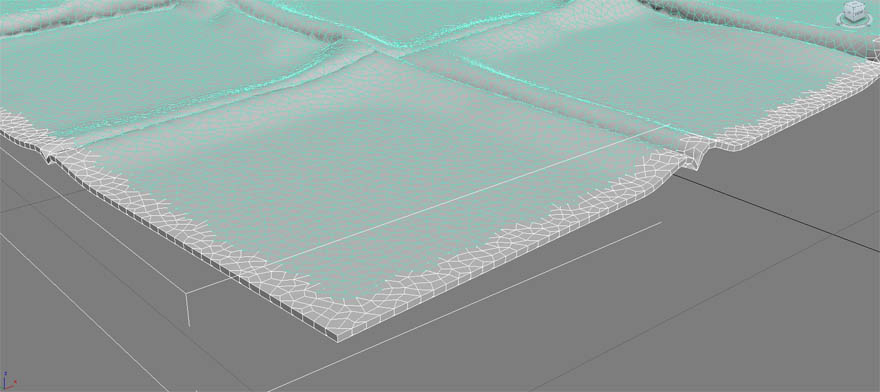
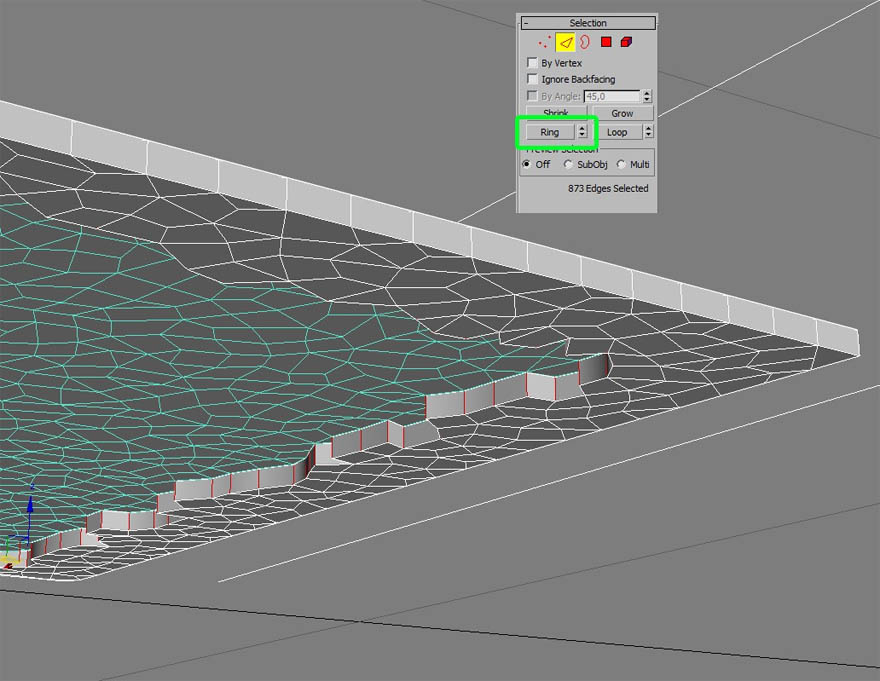
8. I converted this piece into editable poly and selected the edges of the object using ring, so I deleted the selection;
8.我把这块面转换成可编辑多边形并选定边缘的对象使用ring,所以我删除了选择的;
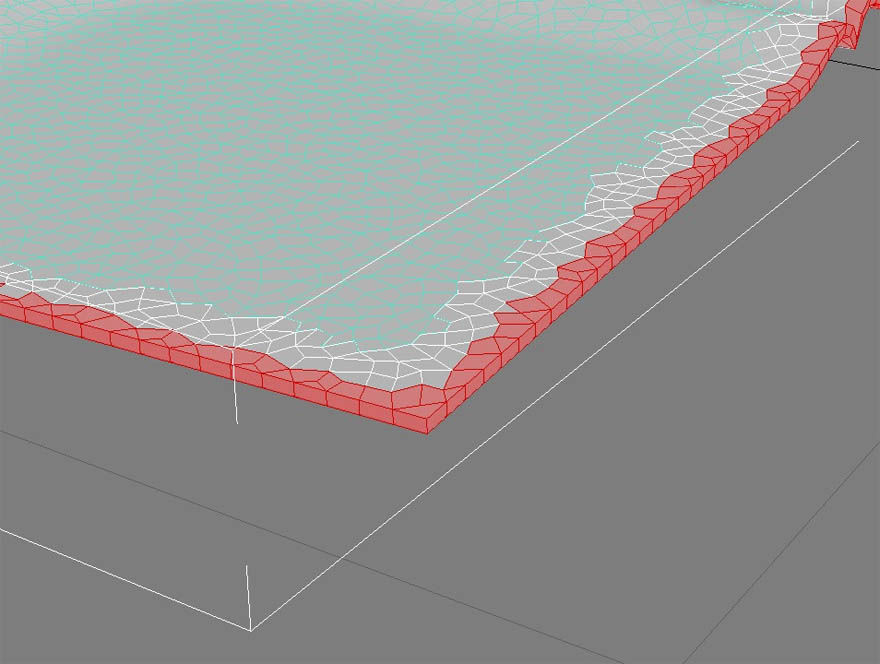
9. Now, select the faces of the all edges and use grow again (step one once again).
9.现在,选择所有边缘的面,再次使用grow(一次迭代)。
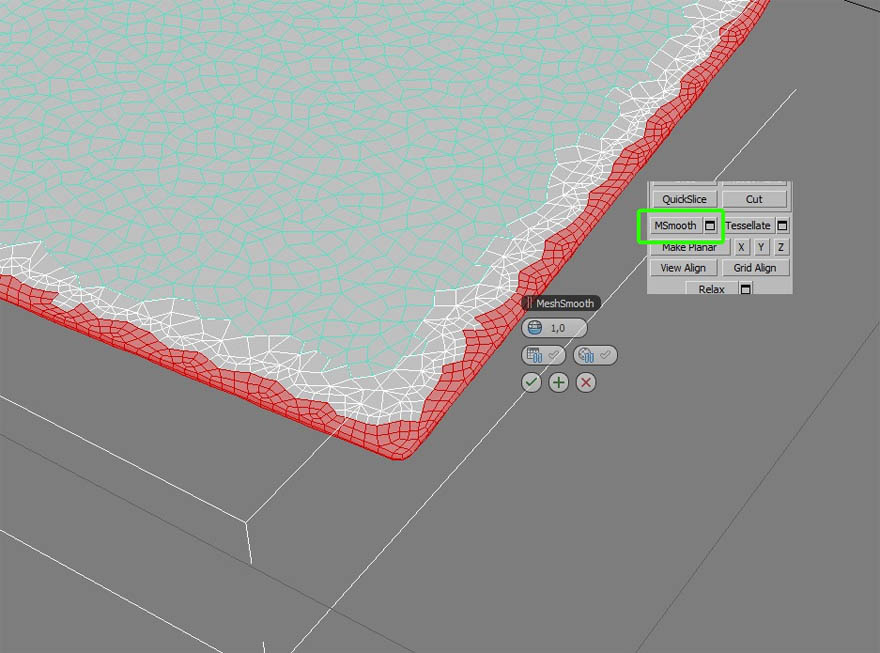
10. Apply mesh smooth and editable poly on faces to smooth them.
10. 应用网格平滑并转换为可编辑多边形来光滑他们。
11. Attach all the edited object (edges) on the rest of the rug, welding the vertices.
11.将所有编辑对象(边缘)attach在一起,然后焊接顶点。
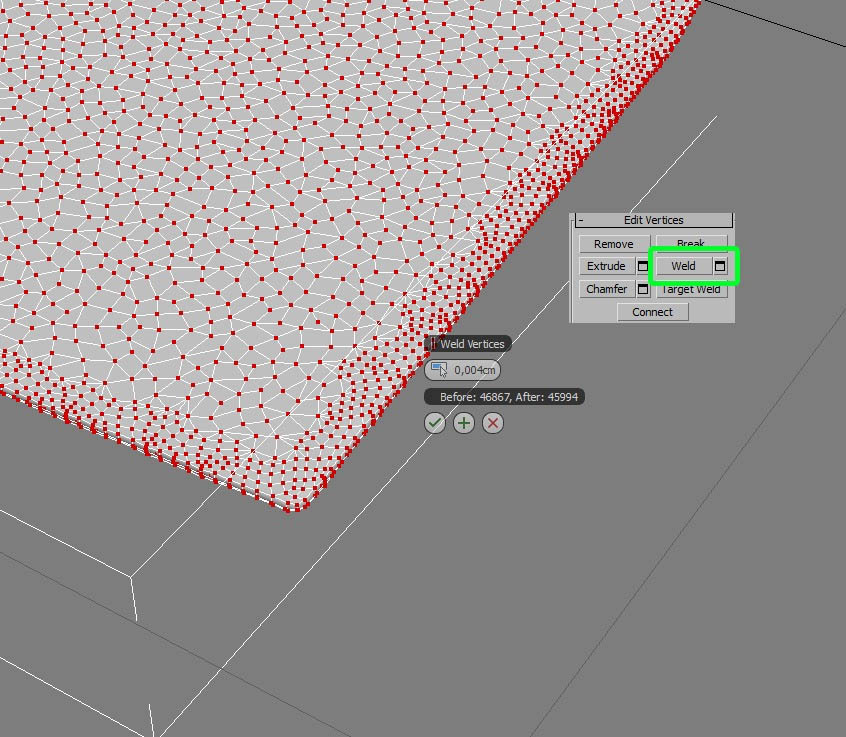
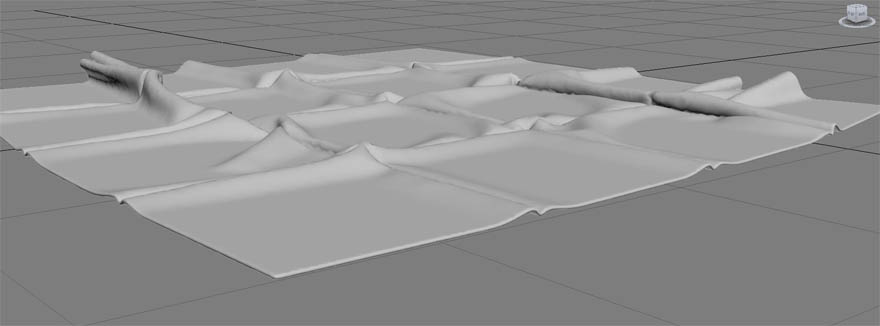
12. And at last, the result is that
12.最后的效果是这样的...
The Chair/椅子
翻译by:cger.com
The creation of that chair is very simple, even with the cloth with lot's of volume and wrinkles.
那把椅子的创建非常简单,只是更多的布的体积和褶皱。
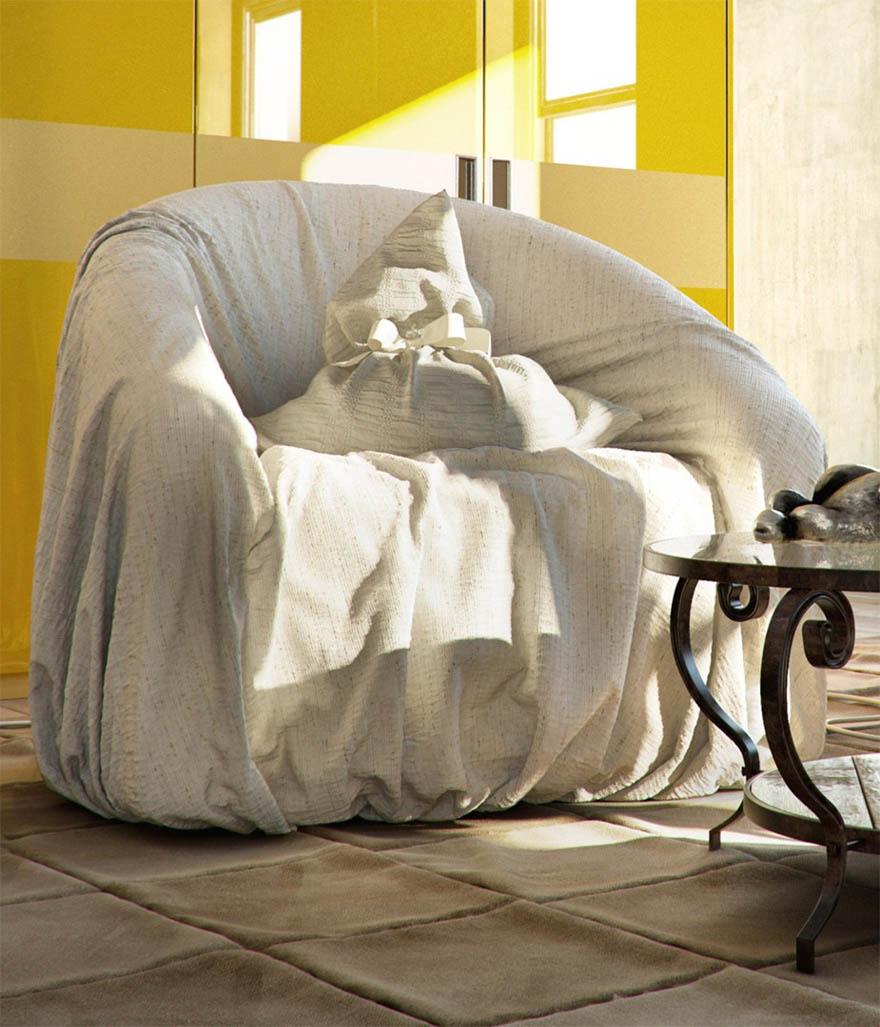
1. For starters, I model a very simple base in 3ds max, leaving that a bit away from the zero point (on the Z axis).
首先,我建模一个非常简单的基础模型在3ds max里,稍微远离零点(在Z轴)。
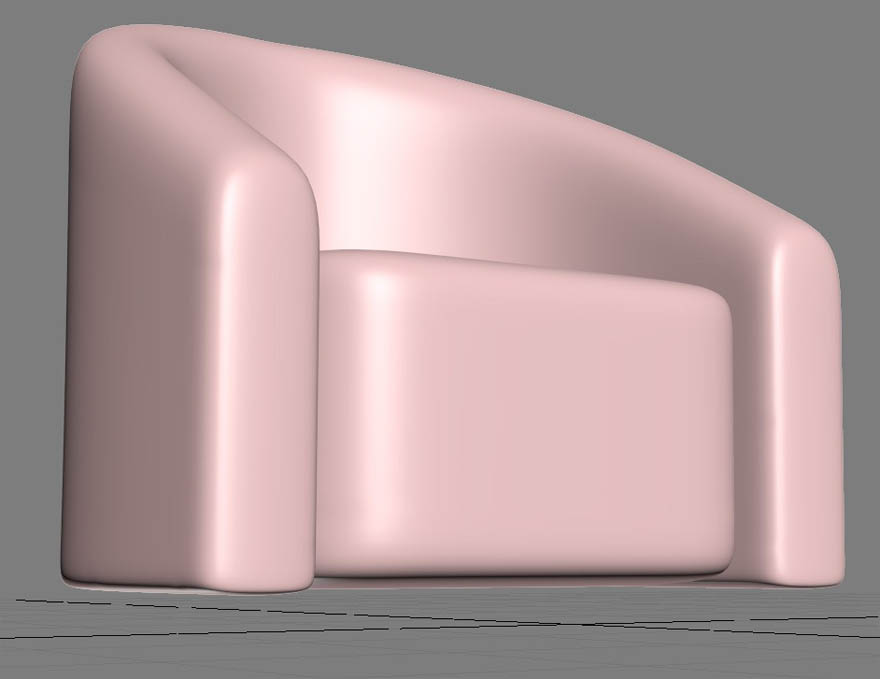
2.After importing the object to Marvelous Designer, I use a circular pattern.
2.导入对象到Marvelous Designer,我使用一个圆形的布料。
This is important to define the ideal position and dimension for the pattern related to the base mesh (Avatar, in MD terminology).
这是很重要的,定义初始的位置和尺寸为布料与基础物体(代理物体)交互。
You can only define that after making some tests, so don't give up if you make it wrong in the first few attempts.
你只能在做一些测试以后定义,所以不要放弃,如果你出错错在前几次的尝试。
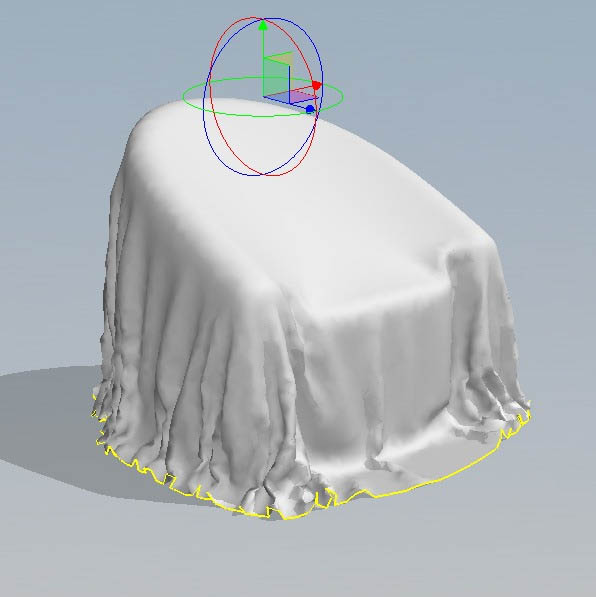
3. After simulation, the borders should look similar to what is shown in the image below.
3.在模拟以后,边界应该类似于下图所示。

4.Now, Activate the option elastic for all the cloth edges.
4.现在,激活选项 弹性 为所有的布边。
这是必要的让 弹性值更小,让 弹性强度更大,这样才能让布料 拥抱 代理物体,见下图。
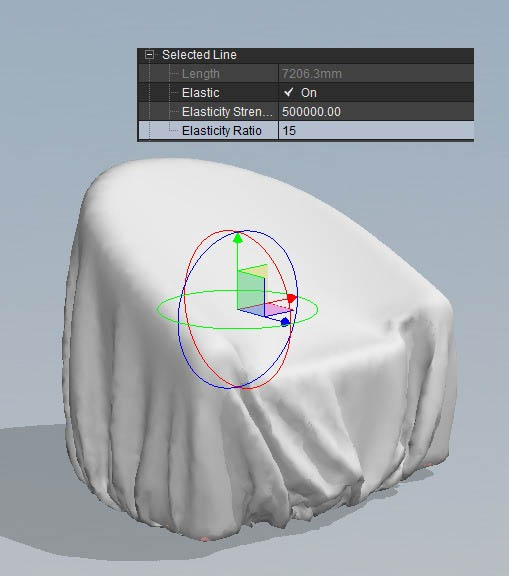
5. Place some pins (W) on the seat region and move that down with the objective of removing the volume from that region, and then pause the simulation.
5.放置一些图钉(快捷键W)在座位上并向下移动目标,从该地区向下凹陷,然后暂停模拟。
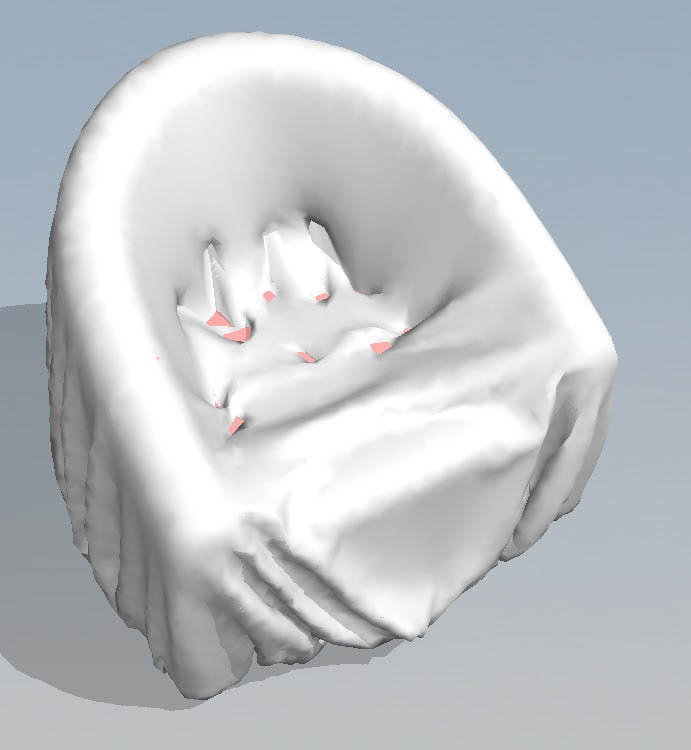
6. Going back to 3dsmax, increase the Avatar to conform the seat cloth.
6.回到3DSMAX,增加覆盖椅子布料的坐垫。
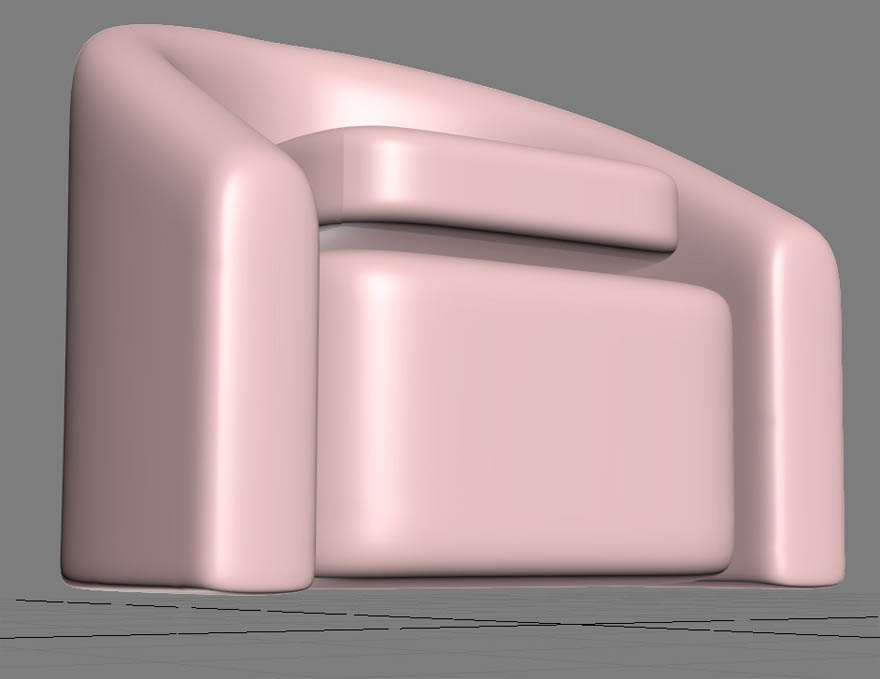
In Marvelous Designer, import the new avatar and remove all the pins and let that react.
在Marvelous Designer,导入新的代理物体并删除所有的图钉,继续计算。
This technique of working with a partial Avatar is interesting in many cases, such as making towels react on tables and chairs.
这种技术处理局部的代理物体是有趣的在许多情况下,如产生毛巾与桌子椅子的反应。
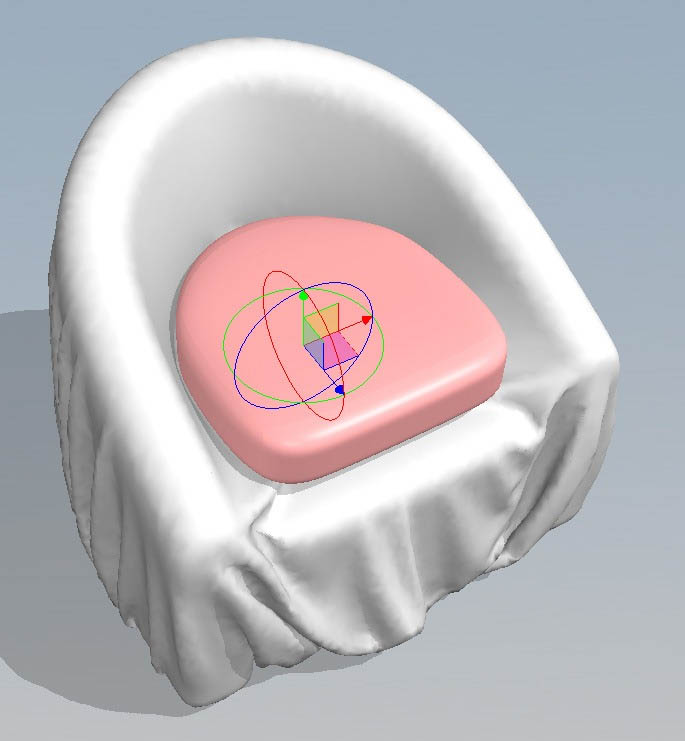
8.Add some pins and move them to create wrinkles on the cloth and so it doesn't look too stretched.
8.添加一些图钉,并移动它们创建皱纹布,让它看起来不太伸展。
Pause the simulation.
暂停模拟。
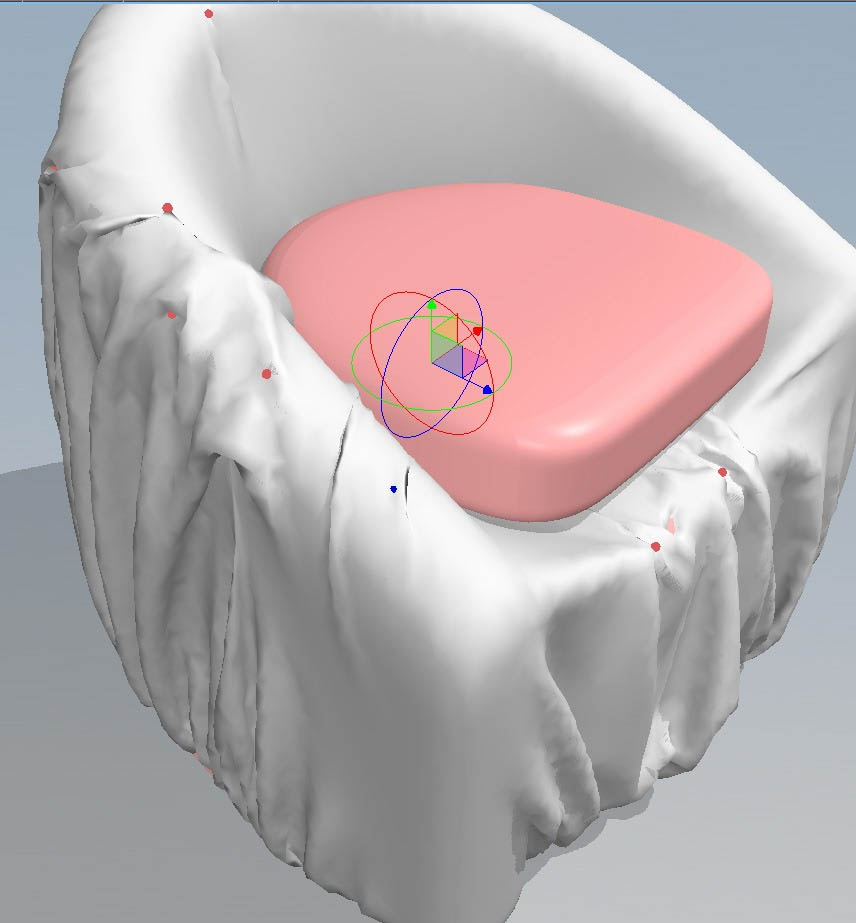
Remove all the pins, so that there aren't any pin marks left on the fabric, and lower the particle distance.
删除所有的针,所以,没有任何别针标记在织物上,降低粒子距离。
The important part here is that if we continue the simulation without the pins, the cloth will set back to its initial formation, so so place some pins just to hold some wrinkles.
在这里重要的是,如果我们没有别针继续仿真,布将回到其最初的状态,所以有些地方还是要钉一些别针用来保持一些皱纹。
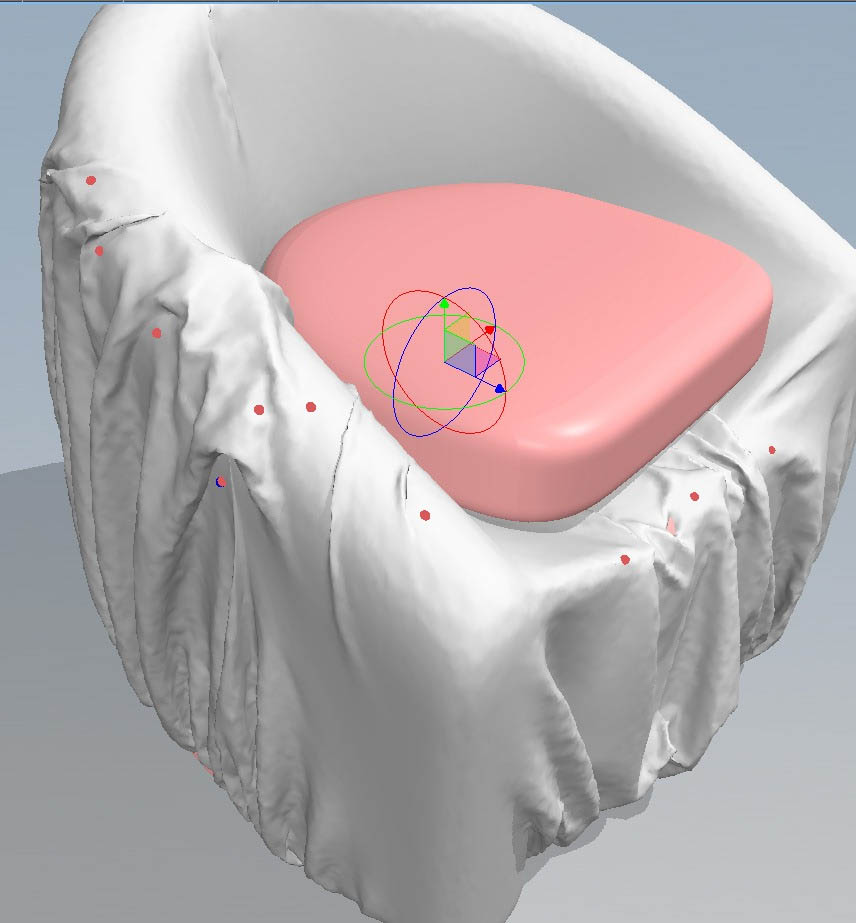
10. Let that simulate a few steps only for the cloth to conform with his new subdivision.
10.让模拟运行几步只为了让布符合他的新细分。

11. Remove all the pins and that's it.
11.移除所有的别针就好了。
In case you have some unnecessary pin marks, just let the simulation run for one or two more passes.
如果你还有一些不必要的别针痕迹,只要让模拟运行一个或两个更多的进程。
That's it!
完成了!
I hope you enjoyed this tutorial, I tried to be objective and also gather some important tips to create the best result for this type of cloth.
我希望你喜欢这个教程,我试图客观地描述,也收集一些重要的技巧来创造这种类型的布的最好的结果。
If you feel I left something out (like more MD viewport snaps for example), let me know in the comments below and I'll add things here later on.
如果你觉得我漏掉了什么(比如更多的MD viewport),让我知道在下面的评论中,我将添加这些东西。
Thank you very much!
非常感谢你!
标签: 布料 Marvelous Designer 模拟 教程
分类:教程 > 3D教程 > Marvelous Designer
发布:CGer | 查看: | 发表时间:2013/8/7 13:27:33 | 更新时间:2025/4/4 23:13:29
| 常见问题,点击查询: | ||
| ●CGer(Cg儿)资源下载帮助 | ||
| ●资源名词解释 | ||
| ●注册/登陆问题 | ||
| ●充值出错/修改密码/忘记密码 | ||
| ●充值赠送系统 | ||
| ●文件解压出错/解压密码 | ||
| ●Payment with Paypal | ||
| ●哪些资源会被列为付费资源 | ||
| ●为何要充值解锁 | ||
| ●免责条款 | ||
| ●联系站长(联系站长前请先仔细阅读 免责条款 ,网站只提供资源,不提供软件安装等服务!) | ||
-
网站置顶/公示帖集合
8 0 0
教程 > 3D教程 > Marvelous Designer
-
网站置顶/公示帖集合
40 0 0
教程 > 3D教程 > Marvelous Designer
-
网站置顶/公示帖集合
115 0 3
教程 > 3D教程 > Marvelous Designer


